For some time now I’ve wanted to write about the Castle Molds from Hirst Arts. HA makes high-quality latex molds in the shape of medieval, Gothic, Roman, Egyptian, fantasy, and sci-fi architecture.
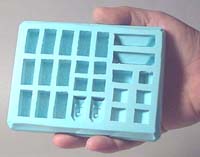
Image from hirstarts.com
You cast the molds using any number of products: plaster of Paris, hydrostone, dental plaster, resin, etc. You then take the pieces and glue them together into buildings, ruins and dungeons which can be used as 3Dterrain for table top minis games or rpgs.
Think of Hirst Arts blocks like fantasy Legos. The only thing limiting you is your imagination.
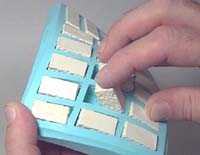
Image from hirstarts.com
Pros
- Cheap- The molds cost 25- 30 USD and can be used forever. The quality is on par with more expensive terrain like Dwarven Forge.
- Limitless Possibilities – With just a few molds you can create infinite dungeons, ruins and buildings for your game.
- Increased Game Play- Visual players will light up when you reveal your 3D gamescape. Plus having the game in three dimensions makes some aspects easiler, line of sight and area of effect. Mind’s eye theater players may scoff at 3d terrain, but overall player’s in my games seem to really enjoy seeing their fantasy world brought into 3d.
- Several Genres Available- You can get molds for numerous historical and sci-fi setting. Also the genres can be used together to create interesting overlap.
- Ease of Use- I am not an artist by any stretch of the imagination, but even I can cast blocks, assemble them, and paint them into something that looks good.
- Easy to Paint- The blocks paint up very well any even the most novice painter will see results. The blocks are very porous and show dry brushing very nicely.
- Community of Support- Once you start into the Hirst Arts hobby there are several websites, podcasts, and videos out there to give you the support and inspiration to create amazing terrain.
Cons
- Time Consuming- While the molds and the materials used are fairly cheap, casting blocks takes time (an hour to cast and a day to dry). And you will need to cast several times to create a building or a dungeon.
- Fragile- If you use plaster of Paris your models will not be very strong, especially if you try to cast thin items like fences and doors.
- Difficult to Transport- If you don’t host your game at your home, finding a way to get your models from point A to point B can be an issue. I use a copy box with sheets of bubble wrap from the post office.
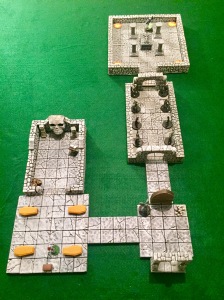
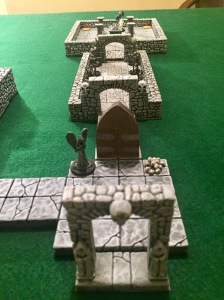
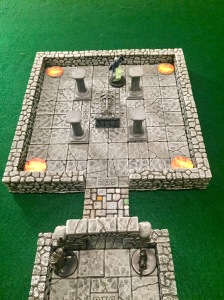
If you can’t afford the majesty that is Dwarven Forge, Hirst Arts is an amazing way of creating 3D terrain for your fantasy roleplaying game. Here is an example of a dungeon that I made for FlatCon. It is a replica of The Tomb of the Sorcerer Thane, a Limitless Adventures Side Quest that I ran last weekend.

Now that you have some sweet 3D terrain, do you need some D&D quest ideas?


